I spent a couple hours yesterday confirming measurements for the new prop shaft and sent a drawing and specifications to Marine Machining and Manufacturing here in Michigan. I'd gotten a quote some time ago from a place out of state that was about $200 more than the quote from the shop here, so I was happy to find a better price for the same service/product. The new shaft and coupling - faced, aligned, and spotted for the set screws - should come in right around $320 for a 1" SS shaft.
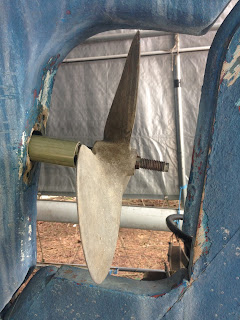
Sorting out the shaft length was made more stressful, however, when I tried to explain to the shop that I needed the propeller to end up somewhere between 27-1/4" to 27-1/2" from the coupling face, something that is apparently more difficult than it seems. I was told that determining where the prop will sit on the taper is a bit of a guessing game, which I can understand, but it would seem like it would be fairly straightforward to get close since the tapers should be standard. At any rate, the reason I need the prop to sit at that distance is because that's the "sweet spot" in the aperture where the rudder can swing stop to stop and the prop blades remain well clear. Too far forward or too far aft, and the blades will start shaving pieces off the rudder aperture. This prop, by the way, is a 13x9R fixed, three blade. Since I never sea trialed the boat, I don't know if the prop is even a good match for the engine. By accounts online and a few conversations with other owners and a shop, it sounds like it's close, though.
 |
| The propeller in its "sweet spot" and the fiberglass stern tube. |
To that end, once I'd gotten the measurements I needed for the prop, I made a few marks on the engine foundations where the transmission cooling hoses were rubbing. I then rigged up my hoist and lifted the engine off the beds and set it in the cockpit. I took an angle grinder with a flapper wheel to the two areas to carve out reliefs for clearance, then covered the areas with two layers of cloth. I also cleaned up the front ends of the beds and wrapped each with a layer of cloth to seal the corners.
Spurred by my frustration with Ariel's cramped engine installation, I double checked the angle of my install. The Westerbeke is rated for no more than a 14 degree installation. I did my best to keep the engine as flat as possible, but I was forced to work with the angle of the hole in the deadwood. Even so, the engine sits at 10.4 degrees. If I can coax it any lower when I finalize the stern tube installation, I will, provided I still have enough room on the flexible mounts for in-water alignment.
That's it for now. It's humid as all get out here, and I have to head back to Northport to install Ariel's new transmission, which should arrive later today. Fingers crossed. It'll be nice to have her back in service.


No comments:
Post a Comment