By the way, it may sound odd to some that I bought this boat 10 years ago and didn't do much with it during that time. I suppose it is a little silly to buy a boat and let it sit, but Tradewinds was purchased as a project; we already have Ariel, a Cape Dory 36, which I've been sailing and maintaining for over 12 years now. I imagine I would have been moving a lot faster on Tradewinds had we not had Ariel. Owning and maintaining one boat is enough work, so it's not too surprising that the project languished. I started it up in earnest this summer for the reason(s) mentioned in the video.
Friday, November 27, 2015
Slow day: Making videos
Sort of a slow, relaxing day around here, so I decided to put together a brief video highlighting some of my progress on Tradewinds. Not sure that this kind of video is my thing, but I thought I'd give it a go. I always enjoy boat videos, especially when winter rolls around. Maybe some others do, too. :)
By the way, it may sound odd to some that I bought this boat 10 years ago and didn't do much with it during that time. I suppose it is a little silly to buy a boat and let it sit, but Tradewinds was purchased as a project; we already have Ariel, a Cape Dory 36, which I've been sailing and maintaining for over 12 years now. I imagine I would have been moving a lot faster on Tradewinds had we not had Ariel. Owning and maintaining one boat is enough work, so it's not too surprising that the project languished. I started it up in earnest this summer for the reason(s) mentioned in the video.
By the way, it may sound odd to some that I bought this boat 10 years ago and didn't do much with it during that time. I suppose it is a little silly to buy a boat and let it sit, but Tradewinds was purchased as a project; we already have Ariel, a Cape Dory 36, which I've been sailing and maintaining for over 12 years now. I imagine I would have been moving a lot faster on Tradewinds had we not had Ariel. Owning and maintaining one boat is enough work, so it's not too surprising that the project languished. I started it up in earnest this summer for the reason(s) mentioned in the video.
Sunday, November 22, 2015
Sta-Lok Fittings For Sale
I acquired a lot of new Sta-Lok fittings, many of which I used for re-rigging Ariel, our Cape Dory 36. I'll be keeping a few others for re-rigging the Alberg 30, when the time comes. Here's a list of what I have available. Feel free to make an offer on the lot or on a partial lot.
5/32" wire:

6 qty - Terminal Studs with 5/16" threads - $20.00/each (Retail: $28.00/each)
9/32" wire:
12 qty - Fork with 7/16" pin - 45.00/each (Retail: $67.00/each)
6 qty - Eye with 1/2" pin hole - 35.00/each (Retail: $44.00/each)
8 qty - Terminal Stud w/ 1/2" thread - $45.00/each (Retail: $53.00/each)
5/16" wire:
12 qty - Fork with 1/2" pin - $64.00/each (Retail: $80.00/each)
7 qty - Eye with 5/8" pin hole - $45.00/each (Retail: $66.00/each)
10 qty - Terminal Stud w/ 1/2" thread - 50.00/each (Retail: $62.00)
3/8" wire: (CD36 Bobstay, by the way)
14 qty - Fork with 5/8" pin - $76.00/each (Retail: $100.00)
2 qty - Eye with 5/8" pin hole - $67.00/each (Retail: $81.00)
8 qty - Terminal Stud w/ 5/8" thread - $70.00 (Retail: $89.00)
And just in case you have 7/16" rigging :):
7/16" wire Eye with with 3/4" pin hole - $100.00 (Retail: $200.00)
5/32" wire:
6 qty - Terminal Studs with 5/16" threads - $20.00/each (Retail: $28.00/each)
9/32" wire:
 |
| This is the collection of 9/32" fittings, worth over $1500 in fittings. Buy the whole lot of 9/32" fittings for $750 + Shipping. |
12 qty - Fork with 7/16" pin - 45.00/each (Retail: $67.00/each)
6 qty - Eye with 1/2" pin hole - 35.00/each (Retail: $44.00/each)
8 qty - Terminal Stud w/ 1/2" thread - $45.00/each (Retail: $53.00/each)
5/16" wire:
12 qty - Fork with 1/2" pin - $64.00/each (Retail: $80.00/each)
7 qty - Eye with 5/8" pin hole - $45.00/each (Retail: $66.00/each)
10 qty - Terminal Stud w/ 1/2" thread - 50.00/each (Retail: $62.00)
3/8" wire: (CD36 Bobstay, by the way)
14 qty - Fork with 5/8" pin - $76.00/each (Retail: $100.00)
2 qty - Eye with 5/8" pin hole - $67.00/each (Retail: $81.00)
8 qty - Terminal Stud w/ 5/8" thread - $70.00 (Retail: $89.00)
And just in case you have 7/16" rigging :):
7/16" wire Eye with with 3/4" pin hole - $100.00 (Retail: $200.00)
Cold, snowy weather projects
With our first snowfall of the season this weekend, I thought it was a good time to drag a bucket of boat parts in from the garage and do a little maintenance. I began with the old Barlow 22 winches, disassembling them and giving the innards a good scrubbing with kerosene. They cleaned up nicely and now the pawls are making a nice, crisp clicking sound - as they should.

Little projects like this one aren't nearly as satisfying as the bigger jobs that get the boat closer to launch, but they are jobs that will need to be completed at some point, so they might as well get done now.

Tuesday, November 17, 2015
What's happening
Things have been so busy at work that I haven't had time to move the project along. I did install the original propeller shaft on Sunday, thinking that I would mark the locations for the engine mounts, then drill and tap them. With the shaft attached, I tweaked the engine position a bit to get the shaft centered in the deadwood. Alignment looked very good, but as I began to think about finalizing the engine position I got nervous because I have no guarantee that the shaft is true and properly positioned in the coupling. Rather than take the gamble, I decided to begin the process of getting a new shaft and coupling so I can be confident that the engine position is as good as it can be.
At this point I haven't heard back from a Michigan propeller shaft shop, so I've contacted Hamilton Marine and begun working with them for an estimate. This evening I drew up some of the shaft/coupling details to get the ball rolling:

At this point I haven't heard back from a Michigan propeller shaft shop, so I've contacted Hamilton Marine and begun working with them for an estimate. This evening I drew up some of the shaft/coupling details to get the ball rolling:

Monday, November 02, 2015
Engine trial fit
So I moved the engine from the cockpit to the new foundations to see how it's going to fit. I'm pleased with the fit, but it's clear that there was a discrepancy between the technical drawings/measurements and the actual engine. The rear mounts are about a 1/2" farther aft than the mockup. I don't think that will be an issue, but the rear part of the foundation has minimal thickness due to the angle, and I'd really like to get at least 1" of thread into the foundations at the aftermost mounting hole. Hopefully I'll be able to do that.


A peek through the stern tube revealed the center of the output coupling, so I'm hoping that alignment is pretty good. Since my stern tube will be permanently fixed in place with the aid of the prop shaft coupled to the engine, alignment shouldn't be too much of an issue.
The only issue that will need correction - at this point, at least - is a tight spot between two cooling hoses and the foundations. The hoses rub the foundations and will quickly chafe through with the engine's vibration, so I'm going to have to grind out a portion of the foundations port and starboard to give the hoses more clearance. I'm not too keen on messing up my fiberglassing job, but I guess there's no other choice.
With regard to building the engine box, I was hoping that the engine would sit far enough aft that I'd be able to slope the front of the engine compartment aft a bit. I'm not sure just how much slope I'll be able to get at this point, but it's not looking like much. Aesthetically and practically, it would be good to have a gentle slope for the ladder to follow and to free up room in the "galley."
Sunday, November 01, 2015
Engine foundations capped and glassed
With temperatures in the high 50s for the day and creeping into the 60s for the next week, I made it my goal to get the 1/2" G10 caps epoxied atop the engine foundations and covered in glass.
I began by water washing the previous round of fiberglass. I then trimmed the rough edges where fiberglass ran off the foundations and gave everything a quick sanding before cleaning up and wiping the surfaces with acetone. Once that was done I cut the 3" wide 1/2" G10 strips to length, sanded all surfaces with 60 grit, beveled the top edges, and trimmed a corner off of each to fit the angle of the hull. I then applied a thin layer of neat epoxy to the foundations before setting both strips in a bed of thickened epoxy, making sure that epoxy oozed out of the edges. I temporarily screwed both strips to the foundations while the epoxy gelled and used a scraper to form the excess epoxy into a sort of fillet that provided a smooth transition between the foundation and the G10 strips.
I cut several pieces of biaxial cloth and plain woven cloth while the epoxy partially cured, then removed the screws and covered both strips and the front edges of the foundations with biaxial and a final layer of cloth to give it a smoother finish.

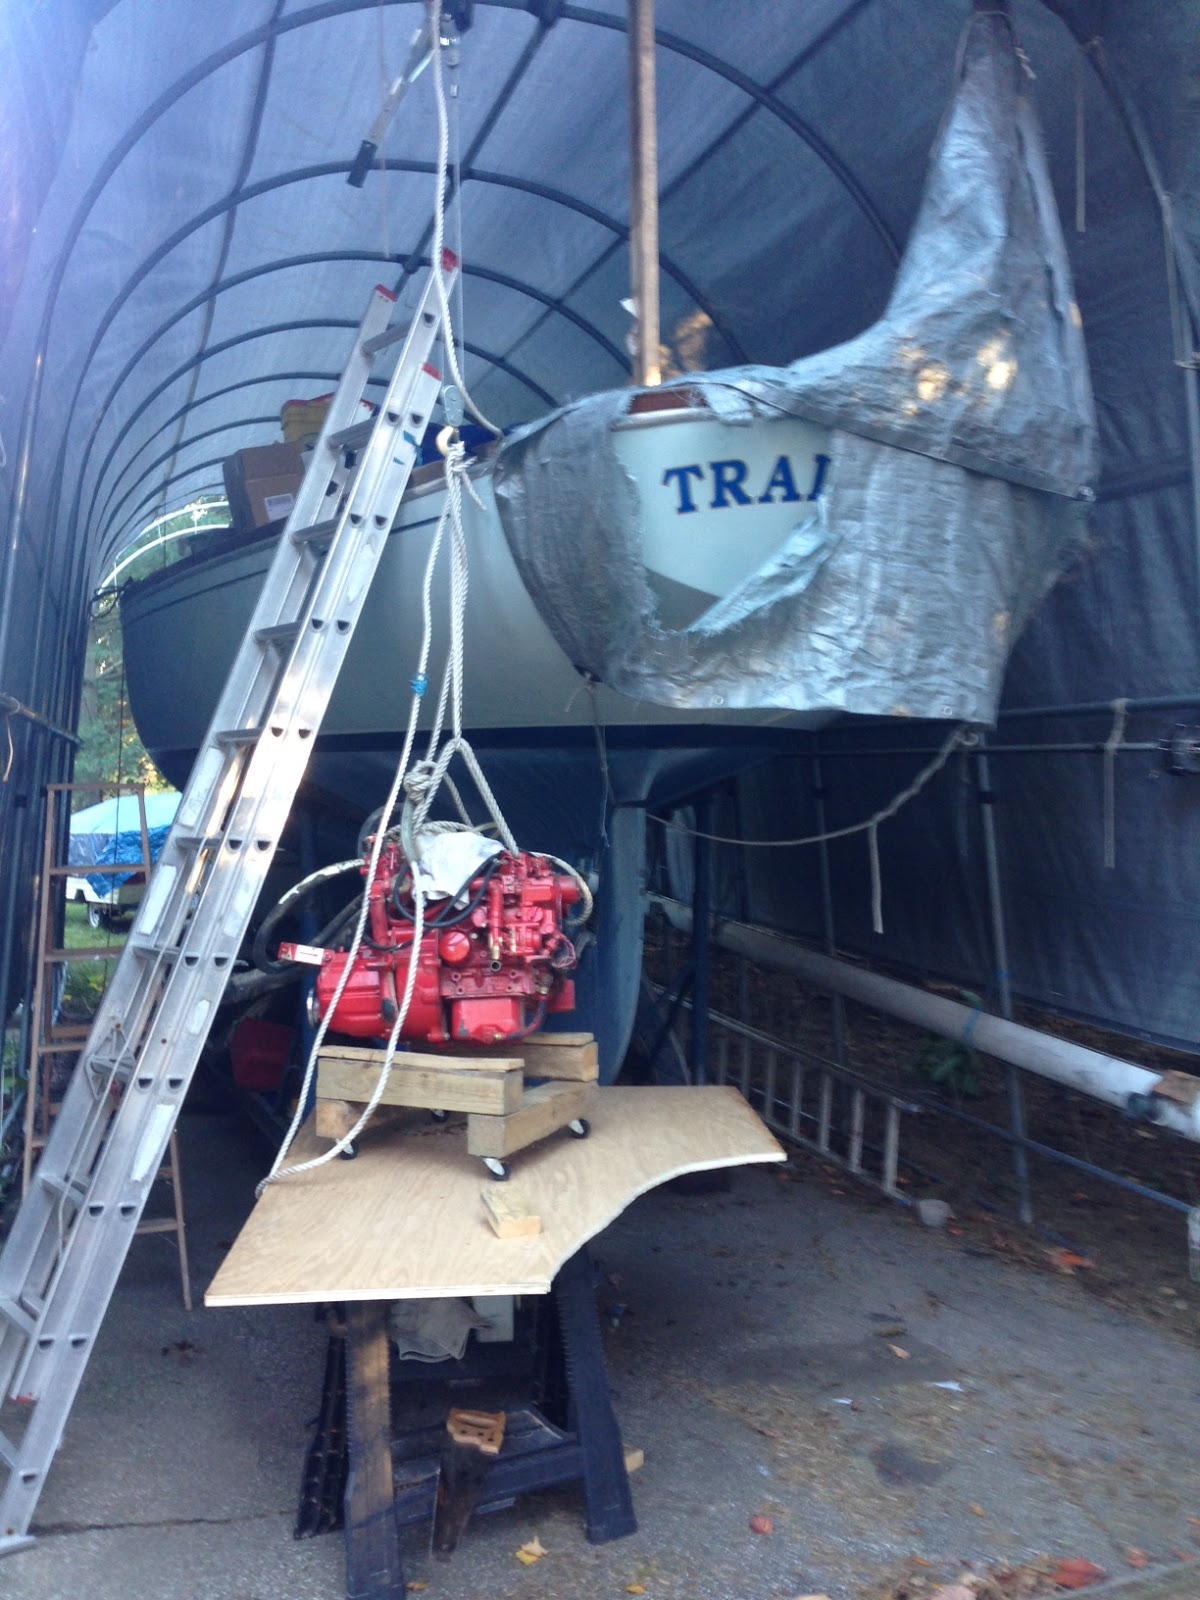
 While the epoxy cured, I decided it was time to get the engine back aboard so I can eventually set it in place and install the stern tube. Additionally, I'd like to have the engine in place while I create the engine box to ensure that everything is going to fit. My rough measurements suggest it will, but I'd like to be sure about the sloping forward edge of the engine compartment, so that means having the engine positioned first.
Although the little Westerbeke 20B Two only weighs about 225, it's a heavy little booger. I used a little trailer and my riding mower to get the engine from the garage to the boat, then rigged a come along to the boat shed (after adding additional support to the structure) and hoisted the thing aboard, setting it back atop its wheeled cart for the time being. Once the beds are cured, sanded and painted, I'll set the engine in place and begin constructing the engine box and setting the stern tube.


I began by water washing the previous round of fiberglass. I then trimmed the rough edges where fiberglass ran off the foundations and gave everything a quick sanding before cleaning up and wiping the surfaces with acetone. Once that was done I cut the 3" wide 1/2" G10 strips to length, sanded all surfaces with 60 grit, beveled the top edges, and trimmed a corner off of each to fit the angle of the hull. I then applied a thin layer of neat epoxy to the foundations before setting both strips in a bed of thickened epoxy, making sure that epoxy oozed out of the edges. I temporarily screwed both strips to the foundations while the epoxy gelled and used a scraper to form the excess epoxy into a sort of fillet that provided a smooth transition between the foundation and the G10 strips.
I cut several pieces of biaxial cloth and plain woven cloth while the epoxy partially cured, then removed the screws and covered both strips and the front edges of the foundations with biaxial and a final layer of cloth to give it a smoother finish.


Although the little Westerbeke 20B Two only weighs about 225, it's a heavy little booger. I used a little trailer and my riding mower to get the engine from the garage to the boat, then rigged a come along to the boat shed (after adding additional support to the structure) and hoisted the thing aboard, setting it back atop its wheeled cart for the time being. Once the beds are cured, sanded and painted, I'll set the engine in place and begin constructing the engine box and setting the stern tube.


Subscribe to:
Posts (Atom)